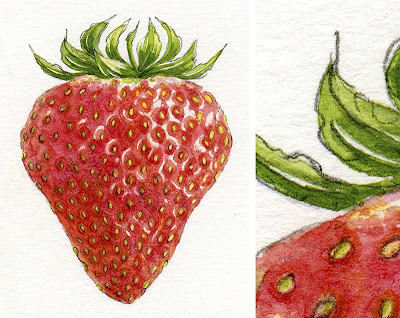
One of difficulties that flatbed scanners have compared to drum scanners is the way the original art is illuminated. If the surface texture is rough, as in the case of watercolor paper, the scanner will usually capture the texture as an unwanted pattern. On the left is a scan at 100% and to it's right a small area enlarged to show the watercolor paper texture problem more clearly.
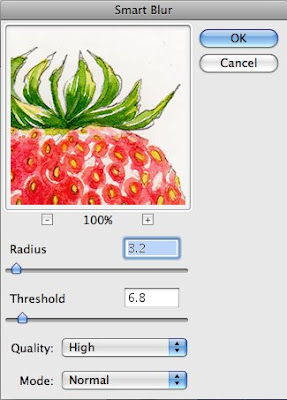
The tool to get rid of the paper texture while preserving the image detail is the "Smart Blur" filter in Adobe Photoshop. Below is its dialog box. You will need to experiment with the settings according to the specific image that you are working with. In general the "Radius" setting will be lower than the "Threshold" setting. The preview window shows the effect of changes you make to those settings. Sometimes, if the adjustments result in degrading the image, it's better to leave a bit of texture and remove it afterwords using the clone or eraser tool. Always use the "High Quality" setting with "Mode: Normal."
The final result – the watercolor paper texture is eliminated while the detail of the painting is preserved.
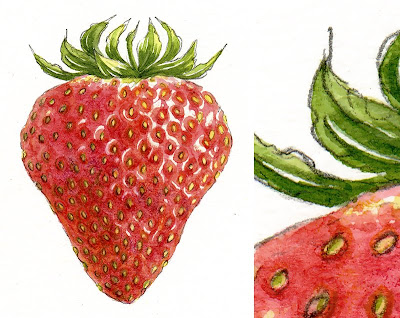
Watercolor study of a strawberry courtesy of Susan Pritchard. To visit her blog, please click
HERE
 The tool to get rid of the paper texture while preserving the image detail is the "Smart Blur" filter in Adobe Photoshop. Below is its dialog box. You will need to experiment with the settings according to the specific image that you are working with. In general the "Radius" setting will be lower than the "Threshold" setting. The preview window shows the effect of changes you make to those settings. Sometimes, if the adjustments result in degrading the image, it's better to leave a bit of texture and remove it afterwords using the clone or eraser tool. Always use the "High Quality" setting with "Mode: Normal."
 The final result – the watercolor paper texture is eliminated while the detail of the painting is preserved.
 Watercolor study of a strawberry courtesy of Susan Pritchard. To visit her blog, please click HERE
Do you have any suggestions for something scanned on cold-press paper? I have an Epson Perfection V30 and I scanned a painting with cold-press Fabriano paper, and the texture is so heavy, it's actually a bit distracting. I know many artists like the effect of heavy texture, but the way it scanned exaggerates the texture beyond the original painting.
ReplyDeleteHere's a closeup of a part of the painting, to give you an idea - http://i.imgur.com/zMuTD.jpg I tried the method above, and it's hard to smooth the texture out significantly without blurring the image. I'm fine with a little texture, just not as much as this.
One technique would be to do the filtering as described - applying the filter as strongly as possible but preserving the area of the painting that has a lot of detail. Then, duplicate that image to a second layer and either apply the filter as strongly as possible for the background, or apply a different filter (e.g. the despeckle filter). Then using the brush eraser erase the detail area from the top image which reveals the lower detailed area. then flatten the image. Basically applying a different detexturizing method for different areas of the image.
ReplyDeleteHere's a quick before and after.
http://i338.photobucket.com/albums/n408/gordonpritchard/Beforeafter.jpg
You might also investigate rotating your painting by 90° and 45° to see if scanning at a different angle might reduce the texture in the original scan.
Hello, Is there a similar tool in GIMP to the smart blur filter in photoshop??
ReplyDeleteHey just wanted to let you know that this post pointed me in exactly the right direction for a graphic I had to fix. Thanks!
ReplyDeleteI just wanted to thank you! this was the only thing that worked on my scanned art!
ReplyDeleteThanks so much for sharing this!
ReplyDelete