Friday, February 27, 2009

The Wayback View – Remote image transfer - 1944

Preview images from the video

Today's journalist brings a great deal of high technology to bear in getting the story out to the newswires. Digital photography allows images to be sent wirelessly via cellphone or computer uplink to satellites and then on to the news agencies for distribution. Surprisingly, in 1944 the process for a reporter at the Minnesota Star Journal and Tribune was not so different as this 2 minute long video shows.

Please press the play arrow to view the video. Note that it may stop for a moment while the video buffers in the background.

Thursday, February 26, 2009

FM Screening Halftone Dot Shapes/Patterns

The choice of FM halftone dot shape is important because it has an impact on plate choice, plate imaging, the aesthetics of the final presswork as well as on the lithographic performance of the press. Because there can be a wider variation of FM dot shapes than AM, this post will just illustrate several representative dot shape options. Each vendors' offerings can then be evaluated by using the information in this post as a guide.

In an FM screen each dot is formed in a halftone cell, typically based on a grid of 16 by 16 pixels. The pixels within the cell are "turned on" in pseudo random fashion in order to form the FM dot shape or tone area. The cells are then stitched together, like a mosaic, in order to form an area of dots or tone area.
On the left (enlarged) is a single halftone 16x16 pixel cell with several pixels turned on. On the right (reduced) is a tone area defined by a mosaic of sixteen individual 16x16 halftone cells.
Following are some basic FM screening dot shapes/patterns and their performance characteristics in use.

Click on the images to enlarge.

First Order FM: Dots are all the same sizeBenefits:Image has a photographic quality even when viewed under a loupe. Often used for fine art reproductions.
Issues:Grainy as well as mottled looking flat tone areas, small dots are more difficult to image consistently on plate and hold on press. Because the issues usually outweigh the benefits, this FM dot pattern is seldom used today except for specialized work.


Second Order FM (a.k.a. Hybrid FM): Dots grow in the tone scaleSecond order FM screens are the de facto standard in today's print production. With this type of halftone screen the dots grow in size through the tone scale. Dot growth can be in one direction – perhaps forming worm-like features as in the first example (Kodak Staccato), or grow in both directions – forming more conventional looking dots as in the second example (Screen Spekta).
Benefits:Depending on the specific vendor's implementation, graininess in flat tone areas is eliminated.
Issues:Thin one or two pixel wide worm features, as in the first example, may demand higher resolution plates, and/or imaging in order to maintain consistency. Dots shapes, as in the second example, may cause a propensity for shadows to plug on press.


Second Order directional FM: Dots grow directionally in the tone scaleDots have a strong directionality. Sometimes this dot shape in a vendor's FM offering is used for only one of the process colors in order to reduce "clumping" or secondary patterns when process colors overprint.
Benefits:Eliminates secondary patterns when process colors overprint.
Issues:Directionality of the dot shape can exaggerate directional issues, such as slur and doubling, on press.


Nasty FM: Dots are plain uglyThis graphic is just intended to emphasize the fact that there is a great variety in FM screen patterns. Therefore one should not apply general statements such as "FM screening is grainy" – quality will vary according to each vendor's implementation.

Monday, February 23, 2009

AM Screening Halftone Dot Shapes

The choice of halftone dot shape is important because it has an impact on the aesthetics of the final presswork as well as on the lithographic performance of the press. This post describes the basic dot shape options available with conventional "AM" halftone screening. The descriptions apply to all the various vendors' offerings – though there will be some very subtle variations between their various implementations.

When dots grow in size from highlight to shadow there is a point at which the dots first touch each other. When that happens there is an effect called the “optical bump.” In a gradient blend this may show up as an artifact of a dark line in an otherwise smooth blend. Another issue is that, because paper moves through a press from printing unit to printing unit, presses are effectively directional imaging devices. This means that halftone dots shapes that are also directional, can interact with the directionality of the press and may exaggerate some issues such as slur and doubling.

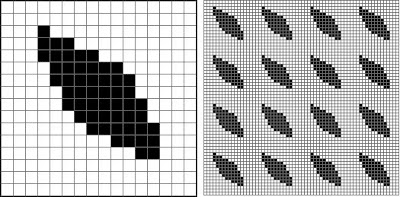
In an AM screen each dot is formed in a halftone cell, typically based on a grid of 16 by 16 pixels. The pixels within the cell are "turned on" in order to form the dot shape. The cells are then stitched together, like a mosaic, in order to form an area of dots.
On the left (enlarged) is a single halftone dot within its 16x16 pixel cell. On the right (reduced) is an area of dots within their 16x16 pixel cells.
Following are the basic AM screening dot shapes and their performance characteristics in use.

Click on the images to enlarge.

Round dot: Dots are round through the tone rangeBenefits: Dot shape is the same for all screen angles and frequencies, optical bump is hidden in the shadows at the 75% tone, dot is non-directional so it is less affected by press problems. Reduces single channel moiré issues. Dot is non directional, i.e. all screen angle dots react the same to directional press issues such as slur and doubling
Issues: Not suited for film-imaged plates because the diamond shape that results at 75% and darker tones is very sensitive to dot gain and sudden loss of shadow detail. Excellent for computer-to-plate imaging because of the greater integrity of halftone imaging as well as the ease of dot gain compensation with tone reproduction curves.


Euclidean dot (a.k.a. Transforming Round Dot): Round/Square/RoundThis is the classic dot shape that resulted from the original etched glass screens from the 19th century and is now replicated in digital form.
Benefits: Dot shape, except for 50% tint, is the same for all screen angles and frequencies, dot is non-directional so it is less affected by press problems. Shadow dots are less prone to dot gain - especially in a film workflow – than the simple Round dot.
Issues: optical bump occurs at 50% midtone tint which puts it in the most important and visible image tones.


Elliptical dot (a.k.a. Transforming Elliptical Dot, Chain Dot): Rounded corner diamond shapeBenefits: Optical bump is moderated by being split into two – when the dots first touch at the long width at the 40% tint and then again at the short width at 60%.
Issues: dot shape varies at different screen angles which can cause single color moiré and uneven dot gain. Dot is directional, at low lpi frequencies the “chaining” of the dots as two points touch can cause lines to appear as artifacts. Directional problems on press such as slur and doubling can cause strong tone and color shifts depending on the angle of orientation of the dots relative to the angle of the paper as it travels through the press.


Square dot: SquareHistorically used for catalog work, letterpress, and specialty work.
Benefits: Gives an impression of a "sharper" looking image on press thus reducing the need for excessive sharpening in image editing applications.
Issues: Very prone to loss of shadow detail due to very thin spaces between shadow dots.


Line dot: LineHistorically used for newspaper work, lenticular, and specialty work.
Benefits: At lower screen rulings can have a strong graphic effect.
Issues: Directional problems on press such as slur and doubling can cause strong tone and color shifts depending on the angle of orientation of the lines relative to the angle of the paper as it travels through the press. Directional lines can introduce very visible subject moiré. Image edges can appear ragged.


Specialty dot:
Any custom dot shape designed to meet specific requirements.
Benefits: Halftone dot optimized for specific applications.
Issues: Requires extensive knowledge, development time, and testing in prepress and pressroom in order to implement.

Here are two examples:

Pepper Dot:Uses small dots within larger conventional dots in order to reduce ink usage on press – especially for newspaper work. (Click on image to enlarge)
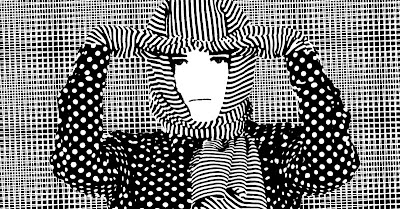
Novelty Dot:Uses a recognizable image or graphic to form the dot. (Click on image to enlarge)

Friday, February 20, 2009

The Wayback View - Graphic Arts Training

Gather a group of printers around the table to discuss the business issues they face and one topic that's sure to come up is the problem of today's graphic arts training - or, more often, the lack of training in their typical customer. They'll complain that today's creatives don't know anything about what it takes to prepare art for their presses. They will share tales of designers who supply art for a company's Annual Report in PowerPoint format, or the 200-page, fully illustrated catalog created in a shareware word processor and saved across 30 floppy discs.

In today's digital world, it seems that anyone with access to a computer can call themselves a designer and the printer is expected to happily receive their files and automagically go to press with them. Unfortunately, more often than not, those files are not even close to being ready for production. Instead, the printer's prepress department must often take on the task of rebuilding the files to prepare them for the press - usually without being able to charge for this service. Print shop owners will wax nostalgic about how much better it was in "the good ol' days" when skilled technical people created press-ready artwork for them.

Interestingly, the good ol' days may not have been that different from the reality of today. Following is a short letter to the editor that appeared some 86 years ago on the topic of graphic arts training - it could have been written yesterday.


"Because I have recently declared in one of our daily papers that our system of art and graphic art education is wrong, I have been plunged, immersed, turned over and over, in hot water.

It is essential that the school of art must give the commercial artist the right preliminary training. And what should that be?

The first step is a change of outlook. It is critical that the student artist be taught that his skills must first of all serve the needs of commerce.

The next step towards making the complete commercial artist is to enable him to become thoroughly acquainted with the methods of production. One of the most serious defects in the present system is that students are pouring from the schools to join the army of work seekers and find themselves but ill-equipped to do the work they seek. Young artists who know nothing of the means by which their ideas have to be produced. It is not just now easy for them to obtain inside knowledge. Manufacturers are secretive - and often look on the creative artist with suspicion and even contempt.

The art masters, the students, the printers, and manufacturers must learn to understand each other and work together. Equip the student with the right point of view towards commerce, the right perspective, and the right technical training, and commercial art will attain new heights of achievement. And print manufacturers themselves will profit by this new relationship with the creative artist through more efficient production methods and happier results for all."

- Charles A. Farmer
- Published in Commercial Art First Series - 1923


After 80 some years, it appears that the old adage that "the more things change - the more they stay the same" still applies.

Monday, February 16, 2009

The "Golden Reference"

Once in a while, even in the best-run printshops, production can go sideways, go south, foul up, mess up, screw up, and go wrong. When that happens a well run printshop turns to their "Golden Reference" as one tool to diagnose the problem and determine a solution. A Golden Reference typically it consists of a file, press sheets, proofs, plates, and documentation. It preserves a record, or "snapshot," of the prepress and print conditions when everything was working correctly. As such, when a problem occurs, the Golden Reference file can be rerun through the workflow and even on press if required. Comparing how the Golden Reference performs at each stage of the current process to the original can help isolate where the differences are and therefore reveal what may be causing the live job to go wrong. The Golden Reference is also useful for validating consumables - such as ink and plates – which may change from batch to batch. It is also useful as the standard by which new processes – such as a change in halftone screening, or a new ink type – can be compared and introduced.
Ideally, the Golden Reference test form should combine objective as well as subjective elements. Sometimes it's easier for evaluation if they are kept separate on the press form as in the sample above. Here are some suggestions for test elements you may want to include (click on image to enlarge).
Remember to make sure that, as much as possible, inline ink usage conflicts and/or influences should be avoided. Also remember that a test form like this should be run "to the numbers" - no proof should be anywhere near the press that runs it. The press operator should be instructed to achieve, as much as possible, the correct solid ink densities across the sheet and not try to make the images look "nice."
A - Standard color bar including targets for CMYK solid ink density, RGB trap, dot gain
B - Background 25C, 18M, 18Y gray with 25 K checkerboard. The primary function is to even out ink usage on press. Can also be used to check across the plate imaging consistency.
C - Solid bars of CMYK in line with the press sheet direction of travel to test solid ink density evenness around the cylinder.
D - Your standard profiling target.
E - CMYK step wedges used for building dot gain curves and ink performance curves.
F - Industry standard target.
G, H, I - Gray balance ring-around targets used to determine whether gray balance is being achieved at the required tone value combinations.
J - Gray balance targets.
K - Industry standard images.
L - Your standard images separated according to your specifications.
M - Image resolution test. The same image is sampled at 100, 200, 300, 400, 600 dpi to show minimum image resolution required for quality reproduction at your halftone line screen frequency. Also useful when changing screening type and/or frequency (lpi).
N - Max black/total area(ink) coverage target. Used to determine maximum TAC.

Friday, February 13, 2009

Be an Alien

To discover opportunities for building strong relationships with print buyers, try looking at all your customer touch points as if you were an alien explorer. Step out of your office and imagine yourself coming from some far away city with the mission of seeking out new printshop civilizations – boldly going where no print buyer has gone before – deep into the realm of Possible New Print Supplier (PNPS).
Explore your facility from this alien perspective, starting from the shop exterior as you park your terrestrial transport vehicle. Does the PNPS environment feel hostile or welcoming? Are the inhabitants engaging or stand-offish? Are they more concerned with your welfare and concerns or theirs? Do they offer guidance so that you can thrive in their unique environment? Do they respect your customs or expect you to adapt to their ways? Do they offer any materials to help bridge any communications gap? Is the feeling you have consistent throughout the PNPS realm right from entry to the delivery bay? Is this a PNPS that you would be proud to bring your associates and superiors to? Finally, is this PNPS one that would be worthwhile returning to and spending your resources with in order to establish trade relations?

Tuesday, February 10, 2009

Your hidden microscope

When a loupe is just not strong enough, a microscope can be a great help in analyzing press problems – especially if it can capture an image that can be shared with coworkers, or sent to vendors or consultants for evaluation. However few printers can warrant the cost of such a piece of equipment. Fortunately most shops have an excellent alternative in the form of a flatbed scanner. Even a very cheap one can do a very respectable job. The two samples below were captured using a very basic $59 (USD) desktop scanner.First, a black and white halftone (original size at left and enlargement at right - click on image to enlarge)Next, is a scan of a color bar which shows a lay down problem with the black printer (original size at left and enlargement at right- click on image to enlarge):For best results use a scanner with the highest possible native (non-interpolated) resolution. Scans at about 1200-2400 dpi seem to work best. Have the graphic to be scanned placed in line with the direction of travel of the scanning head, and use a black backing to prevent show through. Finally, scale the image in Photoshop by changing the resolution (lowering the dpi) with "Resample Image" deselected.

Sunday, February 8, 2009

The value of the relationship

Long-term relationships between print buyer and supplier have both good and bad aspects. Generally, the benefit is to the seller rather than the buyer, which is why long-term relationship building is worth the investment in time and energy. With a long-term relationship buyers lose their objectivity – personal and emotional factors can overwhelm objective decision-making. Also, as print buyers become dependent on the seller’s systems, they are less likely to seriously look at competitive offerings for fear of steep learning curves and/or compatibility with legacy work. Competing sellers find it harder and harder to effectively penetrate the print buyer’s organization and decision making structure and therefore they end up making fewer calls to buyers who they feel – rightly or wrongly – are “locked-in” to steady vendors. Buyers also become lethargic, waiting until the last minute to submit increasingly less specific requests for quotes based on the assumption that their printer intuitively knows what they really want. This, in turn, makes it more difficult for competing printers to respond with an effective, competitive proposal.

Friday, February 6, 2009

Fixing art for the web so that it can be used for print

One of challenges that face printers is dealing with substandard – for print application – art supplied by their customers. Sometimes, art that has been prepared for the web ends up in layouts intended for the press. Often, the graphics contain defects like jpeg compression artifacts or pixel noise in flat color areas. On the left is a supplied graphic at 100% and to it's right a small area enlarged to show the problem artifacts more clearly.
[Click on the image to open a larger version in a new window]The tool to get rid of the image artifacts while preserving the graphic detail is the "Smart Blur" filter in Adobe Photoshop. Below is its dialog box. You will need to experiment with the settings according to the specific image that you are working with. In general the "Radius" setting will be lower than the "Threshold" setting. The preview window shows the effect of changes you make to those settings. Sometimes, if the adjustments result in degrading the image, it's better to leave some artifacts and remove them afterwords using the clone or other tools. Always use the "High Quality" setting with "Mode: Normal."The final result – the artifacts in the graphic are cleared away while the detail of the text and art is preserved.
[Click on the image to open a larger version in a new window]

Removing watercolor paper texture in flatbed scans

One of difficulties that flatbed scanners have compared to drum scanners is the way the original art is illuminated. If the surface texture is rough, as in the case of watercolor paper, the scanner will usually capture the texture as an unwanted pattern. On the left is a scan at 100% and to it's right a small area enlarged to show the watercolor paper texture problem more clearly.The tool to get rid of the paper texture while preserving the image detail is the "Smart Blur" filter in Adobe Photoshop. Below is its dialog box. You will need to experiment with the settings according to the specific image that you are working with. In general the "Radius" setting will be lower than the "Threshold" setting. The preview window shows the effect of changes you make to those settings. Sometimes, if the adjustments result in degrading the image, it's better to leave a bit of texture and remove it afterwords using the clone or eraser tool. Always use the "High Quality" setting with "Mode: Normal."The final result – the watercolor paper texture is eliminated while the detail of the painting is preserved.Watercolor study of a strawberry courtesy of Susan Pritchard. To visit her blog, please click HERE

Wednesday, February 4, 2009

Beethoven, Tchaikovsky, Liszt, Mozart, RGB

We often hear creatives asking the printer to give their color more "pop" - or make it "sing."
Well, now there may be a way to do just that. RGB MusicLab is a free application for the MAC OS that converts the RGB pixel values of an image to Chromatic scale music (MIDI or AIFF file) by reading a score directly from the image data.
And if the music the image creates is not very melodic...well, you can honestly blame the original supplied art for that.
You can download the application by clicking HERE

Monday, February 2, 2009

Buying print – it's scary!

Unfortunately printers seldom buy print themselves, because if they did, they’d have a better understanding of the customer’s perspective – and it’s that perspective that helps determine who gets the print order and who gets the “thanks for your interest” email.
Buying print is scary.
An idea in the creative’s mind. Weeks, maybe months of creative concepts and compromises. Juggling the conflicts of design, text, photography, and illustrations. Their customer approval, finally, based on a concept expressed in awkward inkjet printouts and presentations to the stakeholders. An RFQ based on print specs that may not make any real production sense. Then comes the quotes from maybe three, four, or more printers. If the quotes are within 5% or 10% of each other – how do they choose? If one or more quotes is wildly out, did the printer misunderstand the project? Or are they the only one that really understood the specs? Maybe they're buying the job just to keep the presses running? Are they cutting corners somewhere? One printer changed the specs because they said quality would suffer if it was printed as specified!
How to choose a printer? It’s scary.