Rosette basics
Printing depends on halftoning to simulate shades of gray, color, and image detail. In four color process printing, four halftones – one for each of the cyan, magenta, yellow, and black inks are overlaid to produce the image. Unfortunately, overlapping two or more halftone grids can create an objectionable pattern called a "moiré" which, interestingly is the basis of the rosette.
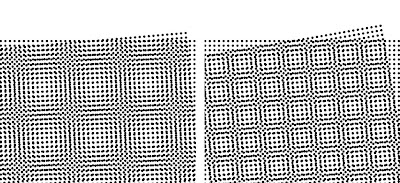
Here, the overlaid halftone grids are 5 degrees and 10 degrees apart:
Here, the overlaid halftone grids are 15 degrees and 20 degrees apart:
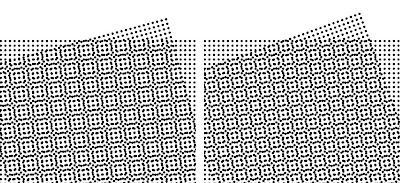
As you can see, the greater the difference in angle between overlapping grids, the smaller the resulting moiré and the less apparent it is.
Here, the overlaid halftone grids are 30 degrees and 45 degrees apart:
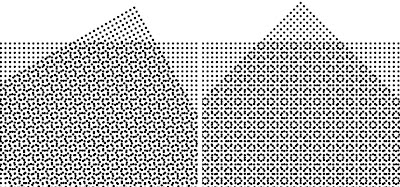
Once the second grid has been rotated to 45 degrees, the moiré pattern is at its smallest and at a sufficient viewing distance seems to disappear.
Because a halftone screen is a quadratic grid (e.g. 90 degrees appears the same as 0 degrees, 135 degrees is the same as 45 degrees) the largest angle difference possible between two screens is 45 degrees, while the largest angle offset between three screens is 30 degrees (90/3=30). As a result, the defacto standard in four color printing has the three most visible process colors 30 degrees apart (C at 105 degrees, M at 75, and K at 45). Since Yellow is the least visible color it is angled at zero degrees – just 15 degrees from cyan. To further reduce moiré, the yellow screen is usually run at a higher frequency – typically about 108% of the other process colors.
The two kinds of rosettes
When screens of cyan, magenta, and black are overlaid at their respective angles (105, 75, 45) they form a moiré pattern called a "rosette."
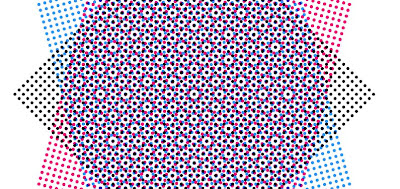
To make the structure easier to see, here is the same graphic but with C, M, and K all black. Note that the yellow screen is not included since, because of its higher frequency, it does not form part of the rosette.
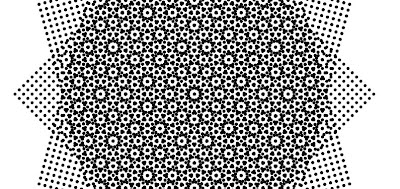
This type of rosette is called a "dot-centered" or "closed-centered" rosette because each of the patterns has a dot in its center.
Here is a gradient using the dot-centered rosette:

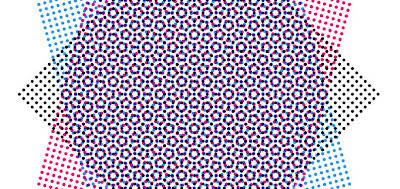
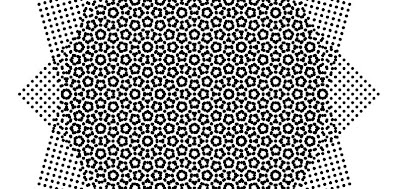
The second type of rosette is called a "clear-centered" or "open -centered" rosette. It is created by shifting one of the process colors one half row of dots from the other two colors.
Here it is in color:
And in black only for clarity:
And as a gradient:

In general, dot-centered rosettes:
• show a less visible pattern than clear centered ones
• have individual dots that land on top of one another - reducing chroma/gamut slightly
• produce color slightly differently than clear-centered rosettes
• tend to lose shadow detail
• with slight misregistration cause significant color shift
• are more popular with low screen frequencies - 100 lpi and lower
In general, clear-centered rosettes:
• show a more visible pattern than dot centered ones
• look slightly lighter due to more paper showing between dots
• produce color slightly differently than dot-centered rosettes
• tend to preserve shadow detail better
• resist color shifts better when slight misregistration occurs
• are more popular with high screen frequencies - 150 lpi and higher
Halftone dots are built inside halftone cells. Those cells have to fit together seamlessly. In order to rotate the screen, you have to rotate the cell – and there are only certain frequency/angle combinations at a given resolution where this seamless tiling is possible. The result is that at screen angles other than zero and 45 degrees, like cyan and magenta, the angles are not exactly as requested. As a result, the rosette can drift from being clear-centered to being dot-centered.
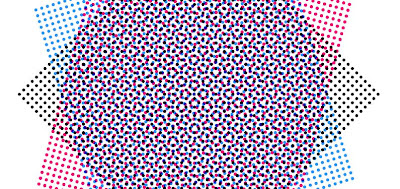
In this image the cyan is off by just two degrees and you can see the rosette going from dot-centered in the upper left to clear-centered in the middle and back to dot centered in the lower right:
In black only for clarity:
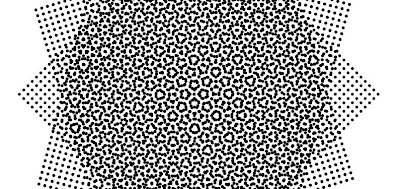
And reduced in size for clarity:

As it can appear in an image:
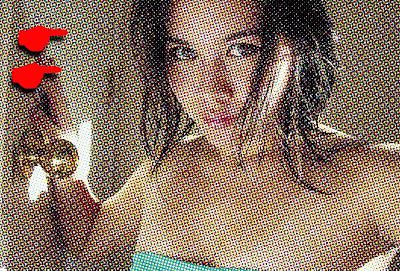
A well designed halftone screen will usually be able to maintain a clear-centered rosette across the largest diagonal plate that will be used. A less well designed screen may see "rosette drift" occurring over a distance of a few inches.
Rosette drift can also be caused by slight press misregistration caused by issues such as back sheet flare, web growth, or "waggle" (lateral sheet movement in the press). In this case rosette drift is not localized but occurs in the entire press sheet area.
In register - clear-centered rosettes:
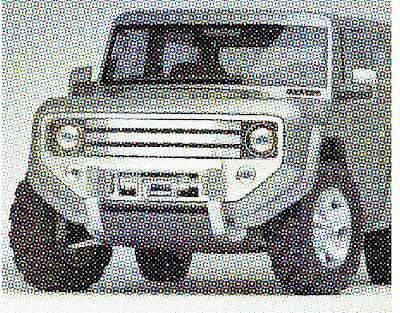
Out of register by one half row of dots - now dot-centered rosettes with a subsequent tone and color shift:
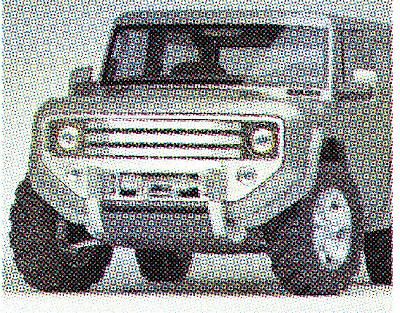
With either cause of rosette drift, the problem can appear in presswork as:
• a moiré. Since a rosette is itself a high frequency moiré it is very sensitive to angular shifts.
• as "noise" or a grainy appearance in flat screen tint areas. This is because as the rosette drifts it has the effect of lowering the frequency of the halftone.
• as a shift in tone as the clear-centered rosettes are filled with a dot and then cleared again.
• as a color shift as the overprinting colors change their relationships with the shift from clear-centered rosettes to dot centered rosettes.
Great tutorial. I'm just wondering if Photoshop has a way of creating clear-centered rosettes? I don't see any way in which I would be able to shift one particular channel.
ReplyDeleteI'm generally struggling to recreate your effects with the same precision in Photoshop :/
Photoshop has a very poor halftone screening algorithm so you cannot get either clear or dot centered rosettes using it.
ReplyDeleteThe angled screens were done in Adobe illustrator as vectors.
The picture of the girl is halftoned in PShop and you can see the quick shift from clear to dot centered rosettes. (Each channel of the CMYK image was taken and screened individually then recomposed in the original CMYK image).
The examples of the car came out of a proper workflow RIP - not Photoshop.
Thanks for the response. Yeah I figured Photoshop wasn't giving me all the stuff I needed. I'll maybe see if there's some type of plugin or way of faking it. Really useful post though. Thanks!
DeleteHi Gordon
ReplyDeleteThank you for this wonderful and helpful information.
You have made it easy for me to understand as It was very clear and straight-forward to understand.
Yatin